[注:本站登载的某些文章并不代表本站支持或反对其观点或肯定其真实性]
如何吹制导流罩(外文资料)
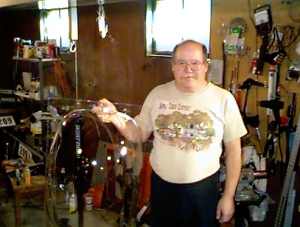
At the WISIL skunkworks (Bill Murphy's basement) we have been creating blown canopies, nose-cones, and fairings for use on HPVs successfully for over a year. These plastic bubbles are aerodynamic, durable, and inexpensive to make. One may ask (OK, more than one asked), how exactly do you make those blown fairings and nosecones? Well, here goes... 在WISIL (这地方我查了一下,在索马里,哈哈)的臭鼬工作室(比尔墨菲的地下室)我们成功地吹制顶棚,头锥和人力骑行器的导流罩有好几年了。这些罩子符合空气动力学的要求,耐用,价格还便宜。
有个人会问(ok, 不止一个会问)你制造这些导流罩的确切方法是怎样的呢?好的,
往下瞧。。。 Materials
材料
Bubbles can be created out of almost any kind of plastic that is available in sheet form. The lower the melting temperature, the easier it is to make them. The types we have typically been using are:
吹制导流罩可以用多种塑料材料,你可以在表中查到。熔点越低,越容易制造。我们使用的典型材料如下:
- ABS (cheap, low forming temp [200ºF], not too strong)
- ABS (便宜, 成形温度低200华氏度,强度不高)
Vivak (low forming temp[250ºF], strong, cheap, slightly photo degradable)
- Vivak(成形温度低 250华氏度, 强度高, 便宜, 可降解)
Lexan (High forming temp[350ºF], expensive, extremely strong and stable)
- Lexan (成形温度高350华氏度, 贵, 特别结实,性能稳定)
The WISIL Missile, and Sean Costin's "boy in the bubble" fairings were made with .030" Lexan, and were a real pain. The main reason we used Lexan was because Sean found a source of a 200' x 4' roll, whereas we can only get Vivak in 4'x8' sheets. The main causes of the pain were the high forming temperatures (long oven heat up times), and the .03" thickness (too thin). We have since determined that between .06" and .09" is the optimal range of thickness to prevent buckling and warpage while riding at high speeds. Thinner than .06" and you need ribs for support. You can go thicker, but of course it is heavier. The bubbles seen on the "Practical HPV Fairing" page are made of .080" Vivak, which is much easier to work with.
“WISIL 导弹”和肖恩考斯汀的“体外气泡”导流罩是由0。03英寸的聚碳酸酯造的,制造它们真的很苦。主要原因是我们使用了聚碳酸酯,它的原料是肖恩找到的一卷200×4英尺的聚碳酸酯材料,尽管我们还找了4×8英尺的Vivak材料。(当然用最好的材料-译者)主要的痛苦来自于高温成形阶段,<长时间加温>, 0.03英寸的厚度,<太薄了>, 我们曾决定做0。06—0.09厚度的,这样能够避免吹出的球在高速骑行时不会出现变形,如果壁厚小于0.06英寸,就要安装龙骨来支撑。你可以做厚些,那样不必安装龙骨,但是重量就大了。你在“塑料导流罩”(下面图例有)看到的是用Vivak材料做的0.08壁厚的。那个做起来就轻松多了。
The Oven
炉子
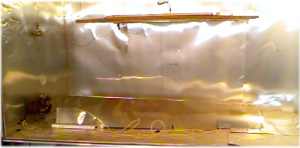
The hardest part is creating an oven that is big enough to hold a fairing, and to keep the temperature controlled properly. In the WISIL skunkworks facility, Bill, along with a host of other members of the WISIL builders contingent, built a 8' by 4' by 4' oven out of aluminum sheeting and aluminum "L" stock, and insulated it with high temperature fiberglass insulation. The oven is heated by placing 6 (surplus) electric base board heater elements on the bottom of the oven, along with two "cal-rods" (they look like big straight oven heating elements). The whole front of the oven opens (a 4'x8' door). The door had a glass windows in it, but it cracked, so now we just have a small peep hole to look in. The oven has a light bulb inside so we can view our progress. The fairing template hangs upside down from the top of the oven, so that when it is blown, gravity helps pull the bubble down.
困难的工作是做一个炉子,要大的足够放下导流罩,而且温度要能合适的控制。在WISIL的臭鼬工厂,比尔和另一帮同事做了一个8×4×4英尺的炉子,炉体是铝质的,还有一个铝制的“L” 形的把手。绝热层是采用玻璃纤维。加热源是采用6个(确保有余量)加热板,安装在炉子底部。还有两个“卡尔棒”(它们看起来像是又大又直的电加热元件)炉子前面开个4×8英尺的门,门上安了个玻璃窗,后来这个玻璃窗坏了,现在我们是通过一个小孔观察炉内状况的。因为要在炉内吹气球,所以我们要通过这个小孔观察进度。导流罩的模板吊在炉顶内侧,所以在吹制时,重力会帮我们把球体往下拉。
Compressed air inlet ----压缩空气进口
Template Sandwich----三明治模板
Bubble----------------------球体
Oven thermomter---------炉温表
Propane burners---------丙烷加热体
Steel plate on top of burners to disburse heat –传热钢板
150W 灯泡
窗户在炉子前面板中部
HPV bubble oven Don Barry, of Infinity Recumbents, made his oven a little differently, and, as his method is easier to build, I will illustrate it. He used Celotex tuff-R (an insulating board with aluminum backing on both sides) to construct his 4'x8'x4' oven. It has good high temperature characteristics, and is rigid enough to create a stand alone oven with. Aluminum tape and long drywall screws will hold it together. He used a large propane camping stove as the heat source (propane tank outside the oven), with a metal hose to feed the propane into the oven. A large sheet of metal over the burners disbursed the heat to warm the plastic sheet evenly. The sides and bottom of the oven are constructed of Celotex insulation, and the template rests on the top of the oven, with a gravity seal.
丹。巴里,做的炉子略有不同,他的办法更简单,我来介绍一下。他用的石膏板,在内外两侧衬上铝箔,炉子有4×8×4那么大。此炉的高温特性佳,它的刚性也很好。它是用铝带和长螺钉加固四壁的。他用一个大型野营用的丙烷液化气炉来加热,液化气罐放在炉子外面。用一个金属软管把丙烷气通到炉内。加热体加热一个大钢板,大钢板再来加热三明治模板上的塑料材料。炉子四周和下部都是用石膏板来保温的。炉顶的模板是通过重力来和炉子密封的。
An oven thermometer is used to measure the temperature. More than one thermometer is recommended to detect hot spots in the oven. Hot spots are the most common cause of deformed bubbles.
炉温表是测炉温的。多设个测试点比较好。温度不均是导致残品的主因。
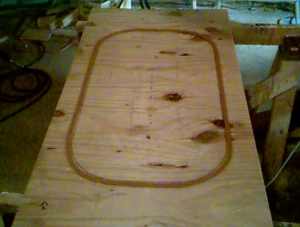
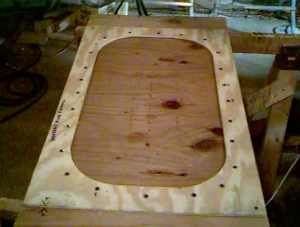
Bubble Template Sandwich (top view) Bubble Template Sandwich (top view) Pressurized air inlet—压缩空气入口 Plywood backing---- 三合板背板 Template---模板 Clear plastic sheet is
sandwiched Between template and backing 干净的塑料板是被夹在背板和模板中间的
Template fastened to backing plate 模板和背板是如此紧固的。
Making a bubble
吹球
After the oven is constructed and the template is made, the fun begins.
炉子做好,
模板做好之后,
好戏开始了。
炉内的三明治模板
Template sandwich in oven
Heat the oven slowly to the proscribed temperature (some experimentation will be needed). Keep a close eye on your plastic sheet. When it starts to buckle you are getting close. When it starts to sag slightly, you are ready to blow. A standard 10 gallon compressor with a hand operated valve is all that is needed to provide pressure. A wire with gradations marked on it, or markings on the back of the oven may be used to measure how deep the bubble is. Blow the bubble carefully, watching for any potential blow outs. 把炉温加热到限制温度。
(必要的实验是要做的)注意你的塑料板,
当它开始弯曲时,
就差不多了。
当它开始略微下垂,
马上准备吹。用一只手操作一个10加仑的压缩机阀门来控制压力。在炉子背板上做好标记,
来判断球是不是被吹到了合适的程度。
小心的吹气,
注意潜在问题的发生。
If you make the bubble deeper than the template is wide, it will balloon sideways, over the sides of the template, and will be hard to remove from the template, as well as less aero. If hot spots are caught early, unhook the air hose. The bubble will deflate partially. The hot spot can be fixed, and the bubble can be re-blown (a few times). 如果你的球体吹的太深了说明你的模板做宽了。 这时球体会偏向一侧,
越过模板,并且很难从模板上取下来,
空气动力形态也不好。如果加热点过早达到,
并且取下了压缩空气,
球体就会回缩。这时,
可以重新加热到控制点并维持此温度,
并重新把球吹大。
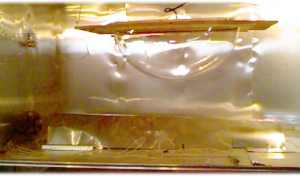
Newly formed bubble in oven新型加热炉
Newly formed bubble 新做的球(导流罩)
Be careful not to get the bubble too close to your heat source, as a runaway bubble can happen quickly. Once the bubble has reached a good shape (Don't try for perfect the first time), turn off the heat, and open the oven door, releasing the heat, while using small bursts of air to maintain the bubble's shape. Once the bubble has cooled, you can remove it from the template, and trim the "tabs".
小心,
别让你的球体过分接近加热源。球体会很容易失控。当球体的形状达到一个让人满意的程度时。(头一次别希望能做出完美的来)关掉加热,
打开炉门,
放掉热量,
用小流量气体维持球的形状。
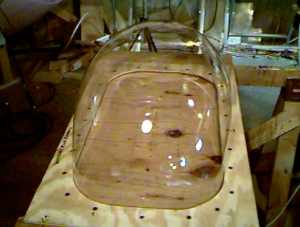
当球体冷却后,
你就可以从模板上把它取下来,
做下小修小改。
Needless to say, none of this would have been possible without Bill Murphy. 不消说,
没有比尔,
这一切都是不可能的。
Mounting the BubblesThe bubbles need to be mounted to some type of light framework, as they are not rigid enough to be load bearing. Aluminum strap makes a good lightweight framework material. The bubbles may be mounted with self sticking Velcro, or pop rivets. (I like pop rivets). Check out the Bubble mounting page, and the Practical fairing pages for more information.
导流罩需要被安装在轻型框架上, 它的刚性不是很足, 铝是制造框架的好材料, 它可以被粘接或是被铆接(我喜欢铆接)查看“导流罩安装”部分,和“塑料导流罩”部分可以让你了解更多安装方法。
Conclusions 结论
While the initial oven and template construction may seem daunting, and the initial few blows will be frustrating, after a little experience you will be having bubbles popping out of your oven like gumballs from a candy machine.The costs and time of making fairings this way is significantly less than traditional methods, which consist of creating a "plug" (a "positive" mold of the fairing), creating the female mold from that, and the making left and right hand fairing halves from the female molds. It's not as stinky either. The shapes made this way are naturally aerodynamic, utterly smooth, and clear. The Vivak bubbles do scratch easily, and they can be painted. Painting the inside of the bubble makes the outside look very shiny. A completely clear fairing, or large clear canopy gets VERY hot in the summer sun. A veritable solar cooker.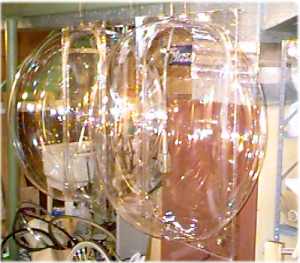 最早的炉子和模板结构可能看起来让人望而却步。同时刚开始吹出来的罩子也让人灰心丧气。可是在有了点儿经验之后你就能做出漂亮的东西来, 最早的炉子和模板结构可能看起来让人望而却步。同时刚开始吹出来的罩子也让人灰心丧气。可是在有了点儿经验之后你就能做出漂亮的东西来,
就像糖果机里造出了警车顶灯一样神奇。这样做导流罩所花费的时间和费用绝对比传统方法节省。
传统方法还会留下一个注塑孔,
而且导流罩还会因为从一个模具里出来而产生不一样(会有“公”“母
”之分)更不可能做一个整球。用这种方法做出来的是很自然的空气动力学形状,
绝对光滑,
干净。 Vivak 材料的容易被刮花,
容易被着色,
可以在内侧做喷涂,
外侧会看起来很鲜艳。
一个很透明的导流罩或是一个透明的顶棚,
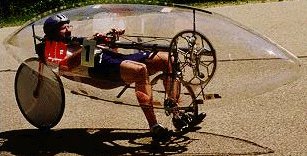
在夏天决对是一个真正的烤炉:) Sean Costin blew a somewhat bigger bubble for his Monkeyhand laid back racer. It looked cool but there were difficulties with getting in and out, rigidity (it was a bit floppy), and the "solar cooker" effect.
肖恩,考斯汀吹了一个大泡泡给他的“猴爪”躺车,
看起来很“酷”,但是进出很不方便。刚性不好(有点软)更要命的是,
那简直就是一个“太阳烤炉”。
-
backplate.jpg (6.27 KB, 下载次数: 2)
-
template.jpg (7.27 KB, 下载次数: 2)
-
hpvsandwich_sm.gif (24.07 KB, 下载次数: 4)
一个老外的躺车(导流罩+遮阳棚)
4.jpg (29.41 KB, 下载次数: 4)
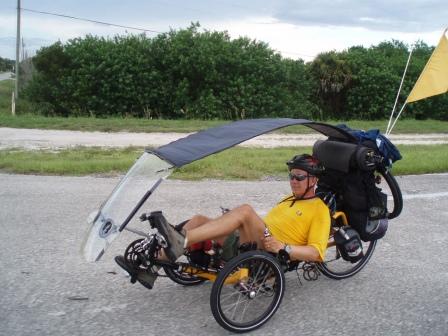
盾牌+透气尼龙,不错,经济实惠~~~~~
稍微简易了一点,,,不过这种结构还是不错的。
简洁,实用。抗侧风。 |
|